Stereoscopic Animated Hypercube (Original version)
 | Hypercube Applet (below) doesn't work even though you installed Java? |
| Run the Hypercube Web-Start Application instead. | |
| This downloads a jnlp (Java Web Start) file that tells Java how to run the Hypercube outside of your browser. | |
| See my Java Web Start notes. |
NASA Astronomy Picture of the Day, April 18, 2001
JARS TOP 1%, July 1996
(S/N B080731-2)
Gamelan Featured Applet, May 1996
Java-SIG's Best 100 Applets
More Java applets here.
In particular:
- Hypercube Version 2.0 -- the OpenGL version.
- My Hyperspace Star Polytope Slicer.
How to See It
- Java
- If your browser supports Java, you should see an animated image above (generated by a Java applet embedded on the page). Otherwise, you should see a static image.
- Viewing
-
- If you don't have 3D glasses, you can view using the look crossed method. Single-click the "Stereo" button twice. This causes the applet to display two separate images which you can view stereoscopically by crossing your eyes. The easiest way to bring the two images together is to hold up a finger between your face and the monitor. Look at the finger, then shift your attention to the images on the monitor. When they are properly merged, you will see three images. The center image is stereoscopic. Ignore the outer images. If you have difficulty crossing your eyes, try moving back away from the monitor. This reduces the degree of eye-crossing required. Once you have the stereoscopic image in focus, try using your hands to frame the center image and block out the outer images. When you get your hands in the correct position, there is an illusion that the 3D image is floating in space between your hands. Since the double image requires more width than height, I recommend that you use the "Detach" button to put the applet into its own window so you can resize it.
- Red/Blue glasses provide the best viewing. If you have Red/Blue 3D glasses, view with the Red filter on the left. Start by looking at the little square in the middle of the image. I got my Garfield 3D glasses from a cereal box. You can cook up your own 3D glasses using Red and Blue cellophane (a flower shop might be a good source). I think some comic book stores also have them. You can also find web sites that will send you free 3D glasses, for example Rainbow Symphony.
- Red/Green 3D glasses are the standard in Europe. If you have Red/Green 3D glasses, single-click the "Stereo" button once to switch to a better color scheme (recommended by Stefan Scheller). View with the Red filter on the left. I have a pair of Red-Green 3D glasses and I find them to be generally inferior to Red-Blue glasses for all purposes because the Red filter transmits a lot of Green light. I don't know if this is typical of most Red-Green glasses.
- Colors
- If you are viewing with 3D glasses, make sure that your browser isn't using "dithered" colors. In Netscape, you can change this using the "Options" menu, General Preferences, Images--choose "Automatic" or "Substitute Colors". Those with mild color-blindness may have trouble seeing the image.
The User Interface
- Start/Stop Button
- The Start/Stop button starts/stops the applet's rotation thread. The button label switches from "Start" to "Stop" as appropriate.
- Detach/Attach Button
- The Detach Button detaches the applet from the Web page and places the applet in its own frame window. You can resize the frame window or maximize it to fill the entire screen. Once the applet has been detached, the button label changes to "Attach" and clicking the button causes the applet to re-attach to the Web page.
- Speed Control
- The Speed Control varies the speed of the animation in a range of 1 through 100 (arbitrary units). Click on the "+" button to increase the speed. Click on the "-" button to decrease the speed. Above a certain point, increasing the speed will have no effect due to your computer's limitations.
- Projection Control
- The Projection Control varies the viewpoint distance for Projection from 4D onto 3D. The range is 0 through 95 in steps of 5. A setting of 0 gives an infinitely distant viewpoint (orthogonal projection). High settings give a "fish-eye" effect.
- Stereo Button
- The "Stereo" button cycles through these 3 viewing modes:
- 1. Superimposed images for viewing with Red-Blue 3D glasses (Red on the left).
- 2. Superimposed images for viewing with Red-Green 3D glasses (Red on the left).
- 3. Separated images for viewing with the look crossed method.
- Manual Rotation
- To rotate the image in 3-space, click on the Hypercube panel and drag the mouse with the mouse button held down. To rotate in 4-space, hold down the shift key before you click and drag. With repeated application of these 2 types of rotation, you can achieve any desired 4-space orientation of the Hypercube.
Hypercube Info
- What is It?
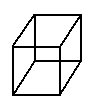
- You are looking at the projection of a 4-dimensional Hypercube onto 3 dimensions. A Hypercube is a generalization of a 3-dimensional cube to 4 or more dimensions. A 4-dimensional Hypercube is also called a Tesseract. The above Hypercube is randomly tumbling in its 4-dimensional space. Note that four edges meet at each vertex of the Hypercube. These edges are all mutually perpendicular in 4-dimensional space.
- Construction
- The human mind does not work well with more than 3 dimensions.
The easiest approach is to extend what you know from lower-dimensional spaces:
- To construct a Line from 2 points, place one point above the other and connect them.
- To construct a Square from 2 lines, place one line above the other and connect the ends.
- To construct a Cube from 2 squares, place one square above the other and connect the corners.
- To construct a Hypercube from 2 cubes, place one cube above the other (in the 4th dimension) and connect the vertexes.
Program Notes
- Projection from 4D onto 3D
- Just as a 3-dimensional cube can be projected onto 2-dimensions
 (a flat picture of a cube),
a 4-dimensional cube can be projected onto 3-dimensions.
Rays are traced in 4-space from a viewpoint at (0,0,0,w0), through each vertex of the object
(which is centered at (0,0,0,0)),
to a 3-space located at w=0. The viewpoint distance w0 can be changed using the applet's
Projection Control. A setting of 0 gives infinite w0 (orthogonal
projection). A setting of 1.0 (not allowed) would have the
viewpoint touching the hypersphere that is traced out by the object's vertices.
To be precise, the Projection Control setting is the square of (R/w0) where
R is the radius of the hypersphere traced out by the object's vertices and w0
is the viewpoint distance from the origin.
(a flat picture of a cube),
a 4-dimensional cube can be projected onto 3-dimensions.
Rays are traced in 4-space from a viewpoint at (0,0,0,w0), through each vertex of the object
(which is centered at (0,0,0,0)),
to a 3-space located at w=0. The viewpoint distance w0 can be changed using the applet's
Projection Control. A setting of 0 gives infinite w0 (orthogonal
projection). A setting of 1.0 (not allowed) would have the
viewpoint touching the hypersphere that is traced out by the object's vertices.
To be precise, the Projection Control setting is the square of (R/w0) where
R is the radius of the hypersphere traced out by the object's vertices and w0
is the viewpoint distance from the origin.
- Stereoscopic 3D
- The Red/Blue stereoscopic image is constructed by ray-tracing. We trace a ray from each eye through each vertex (in 3D) to a point on the 2-dimensional plane of the screen. Then we connect those points with lines in the 2-dimensional plane, using Red lines for the left eye's rays and Blue lines for the right eye's rays. Click here for the mathematical details.
Other Hypercube Links
- Rudy Rucker (Mathematician/Writer -- Hyperspace, Sci Fi, Math)
- 4th dimension: Tetraspace Detailed explanations by Garrett Jones
- "Spaceland" 4-dimensional Novel by Rudy Rucker
- Stefan Scheller's Science Site.
- Stefan Scheller's Stereoscopic Interactive Hypercube Slicer
- John Bailey's 4-dimensional Rubik's Cube (uses JavaScript)
- The Tesseract -- A Guided Demonstration
- The Hypercube Game
- Russian Translation of this page.
- Eric Swab's Measure Polytope
September 28, 1997: Thanks to Jens for diagnosing a Color problem which was preventing the applet from working with browsers using JDK 1.1.
The Java Source Code: <As an html file> <As a .java file>
My Critique of the Source Code
<Dogfeathers Home Page> <Mark's Home Page> <Mark's Java Stuff>
Email: Mark Newbold
This page URL: http://dogfeathers.com/java/hypercube1.html